Embedding Guide
Learn how to embed Agent5ive agents in your websites and applications.
Overview
Agent5ive provides multiple ways to embed your agents into your own websites and applications. This allows your users to interact with your agents directly from your digital properties without having to visit the Agent5ive platform.
There are three primary methods for embedding your agents:
- JavaScript SDK - A lightweight script that adds a chat widget to your website
- iFrame Embedding - Directly embed the agent chat interface into your webpage
- React Component - Integrate the agent into your React applications
- MCP Integration - Connect your agent to MCP-compatible clients like Claude Desktop
Important: Before you can embed an agent, it must be published publicly in your Agent5ive dashboard. Private agents cannot be embedded or accessed through the JavaScript SDK, iFrame embedding, or MCP integration.
Important: Agent Visibility Setting
Agents must be published publicly in your Agent5ive dashboard for embedding to work. Private agents cannot be accessed through the JavaScript SDK, iFrame embedding, or MCP integration.
To publish your agent publicly, go to your Agent5ive dashboard, select the agent, navigate to the "Deploy" tab, and click the "Publish Publicly" button.
JavaScript SDK
The JavaScript SDK is the easiest way to add your agent to any website. It creates a customizable chat widget that appears as a button in the corner of your site. When clicked, it opens a chat interface where users can interact with your agent.
Installation
To add the Agent5ive chat widget to your website, add the following script tag to the <body> section of your HTML:
<script src="https://www.agent5ive.com/agent5ive.js" defer></script>Then, initialize the widget with your agent's deployment ID and configuration options:
<script>
  document.addEventListener('DOMContentLoaded', function() {
    if (window.AgentXChat && window.AgentXChat.init) {
      window.AgentXChat.init({
        deploymentId: "YOUR_DEPLOYMENT_ID",
        agentName: "Your Agent Name",
        baseUrl: "https://www.agent5ive.com",
        buttonText: "Chat with Agent",
        buttonColor: "#0ea5e9",
        buttonTextColor: "#ffffff",
        chatWindowColor: "#ffffff",
        chatWindowTextColor: "#000000",
        headerColor: "#0ea5e9",
        headerTextColor: "#ffffff",
        position: "right",
        bottomOffset: "20px",
        rightOffset: "20px",
        zIndex: 1000,
        initialMessage: "Hi there! How can I help you today?"
      });
    }
  });
</script>
What Users Will See
When you embed your agent using the JavaScript SDK, users will see:
- Chat Button - A floating button in the corner of your website with your agent's name
- Chat Interface - When clicked, a chat window opens with your agent's welcome message
- Screen Sharing Consent - Users are asked for consent to allow the agent to see the website screen. This enriches the agent's context and helps users complete tasks by understanding the web environment. This applies to both text and voice interactions.
- Tool Indicators - If you've enabled tools like Web Browsing or Trend Search, users will see toggles for these tools
- Voice Chat Button - If you've enabled voice features, users will see a dedicated voice button that allows them to interact with your agent using voice without opening the chat box. This provides a seamless voice-first experience directly from your website.
- Image Upload - If you've enabled image vision, users will see an upload button
The chat interface is designed to be intuitive and user-friendly, with your agent's personality and capabilities fully preserved.
Disabling Screen Context
If you prefer not to ask users for screen sharing consent, you can disable this feature by setting the enablePageContext property to false. This will prevent the consent prompt from appearing and disable page context entirely.
JavaScript Example:
AgentXChat.init({
  deploymentId: "YOUR_DEPLOYMENT_ID",
  agentName: "Your Agent",
  baseUrl: "https://www.agent5ive.com",
  enablePageContext: false  // Disables screen context
});
React Example:
<ChatWidget
  deploymentId="YOUR_DEPLOYMENT_ID"
  agentName="Your Agent"
  baseUrl="https://www.agent5ive.com"
  enablePageContext={false}  // Disables screen context
/>User Experience:
When a user interacts with your embedded agent, they'll experience the same high-quality conversations as on the Agent5ive platform. Your agent will maintain its personality, use its configured tools appropriately, and provide the specialized assistance you designed it for.
Configuration Options
| Option | Type | Required | Description |
|---|---|---|---|
| deploymentId | string | Yes | The unique ID of your agent deployment (found in your Agent5ive dashboard) |
| agentName | string | Yes | The name of your agent (displayed in the chat header) |
| baseUrl | string | Yes | The base URL of the Agent5ive platform (use https://www.agent5ive.com to avoid CORS issues) |
| buttonText | string | Yes | The text displayed on the chat button |
| buttonColor | string | No | The background color of the chat button (hex code) |
| buttonTextColor | string | No | The text color of the chat button (hex code) |
| chatWindowColor | string | No | The background color of the chat window (hex code) |
| chatWindowTextColor | string | No | The text color of the chat window (hex code) |
| headerColor | string | No | The background color of the chat header (hex code) |
| headerTextColor | string | No | The text color of the chat header (hex code) |
| mobileBreakpoint | number | No | The screen width (in pixels) at which to switch to mobile view |
| mobileFullScreen | boolean | No | Whether to display the chat in full screen on mobile devices |
| position | string | No | The position of the chat button ('left' or 'right') |
| bottomOffset | string | No | The distance from the bottom of the screen (CSS value) |
| rightOffset | string | No | The distance from the right of the screen (CSS value) |
| zIndex | number | No | The z-index of the chat widget (for layering with other elements) |
| enablePageContext | boolean | No | Default: true. When enabled, users are prompted for consent to share their screen context with the agent. Set to false to disable the consent prompt and screen context feature entirely. |
| initialMessage | string | No | The first message displayed from the agent when the chat is opened |
JavaScript API
The Agent5ive JavaScript SDK provides additional methods for programmatically controlling the chat widget:
| Method | Description |
|---|---|
| AgentXChat.open() | Opens the chat window |
| AgentXChat.close() | Closes the chat window |
| AgentXChat.toggle() | Toggles the chat window open/closed |
| AgentXChat.sendMessage(text) | Programmatically sends a message as the user |
| AgentXChat.clearConversation() | Clears the current conversation history |
Example Usage
Here's an example of how to use the JavaScript API to control the chat widget:
<button onclick="window.AgentXChat.open()">Open Chat</button>
<button onclick="window.AgentXChat.close()">Close Chat</button>
<button onclick="window.AgentXChat.toggle()">Toggle Chat</button>
<button onclick="window.AgentXChat.sendMessage('Hello, agent!')">Send Message</button>
<button onclick="window.AgentXChat.clearConversation()">Clear Chat</button>
Custom Styling
You can further customize the appearance of the chat widget by adding CSS variables to your website:
:root {
  --agent5ive-primary-color: #0ea5e9;
  --agent5ive-text-color: #ffffff;
  --agent5ive-bg-color: #ffffff;
  --agent5ive-input-bg-color: #f1f5f9;
  --agent5ive-border-radius: 8px;
  --agent5ive-font-family: 'Inter', sans-serif;
}AI-Powered Theme Customization
Agent5ive offers an innovative AI-powered theme customization feature that automatically generates custom CSS styles for your embedded chat widget based on your brand identity. This ensures perfect brand alignment between your website and the agent widget without manual CSS coding.
✨ AI-Generated Brand-Aligned Themes
Simply upload your brand image (logo, website screenshot, or brand colors) and/or provide a brand description, and our AI will automatically generate matching CSS styles for your chat widget. The generated styles are hosted on Vercel Blob Storage and can be easily integrated into your embed code.
How It Works
The AI theme customization process is simple and intuitive:
- Navigate to the Theme Tab - In your Agent5ive dashboard, go to the Deploy section and click on the "Embed this agent" button. Select the "Theme" tab.
- Provide Brand Assets - You have two options:
- Upload a Brand Image (Optional) - Upload your logo, a website screenshot, or an image showing your brand colors (max 5MB)
- Add a Brand Description (Optional) - Describe your brand style in text (e.g., "Modern tech startup with blue and white colors, clean and minimal design")
Note: If you don't provide an image, a minimum of 5 words is required for the description.
- Generate Theme - Click the generate button and let AI analyze your brand assets and create custom CSS styles
- Download CSS Files - Two CSS files will be automatically generated and hosted:
agent5ive-widget-theme.css- Styles for the widget button/popupagent5ive-chat-theme.css- Styles for the chat interface
- Use in Your Embed Code - Reference the hosted CSS URLs in your AgentXChat initialization
Visual Example
Here's what the AI theme customization interface looks like:
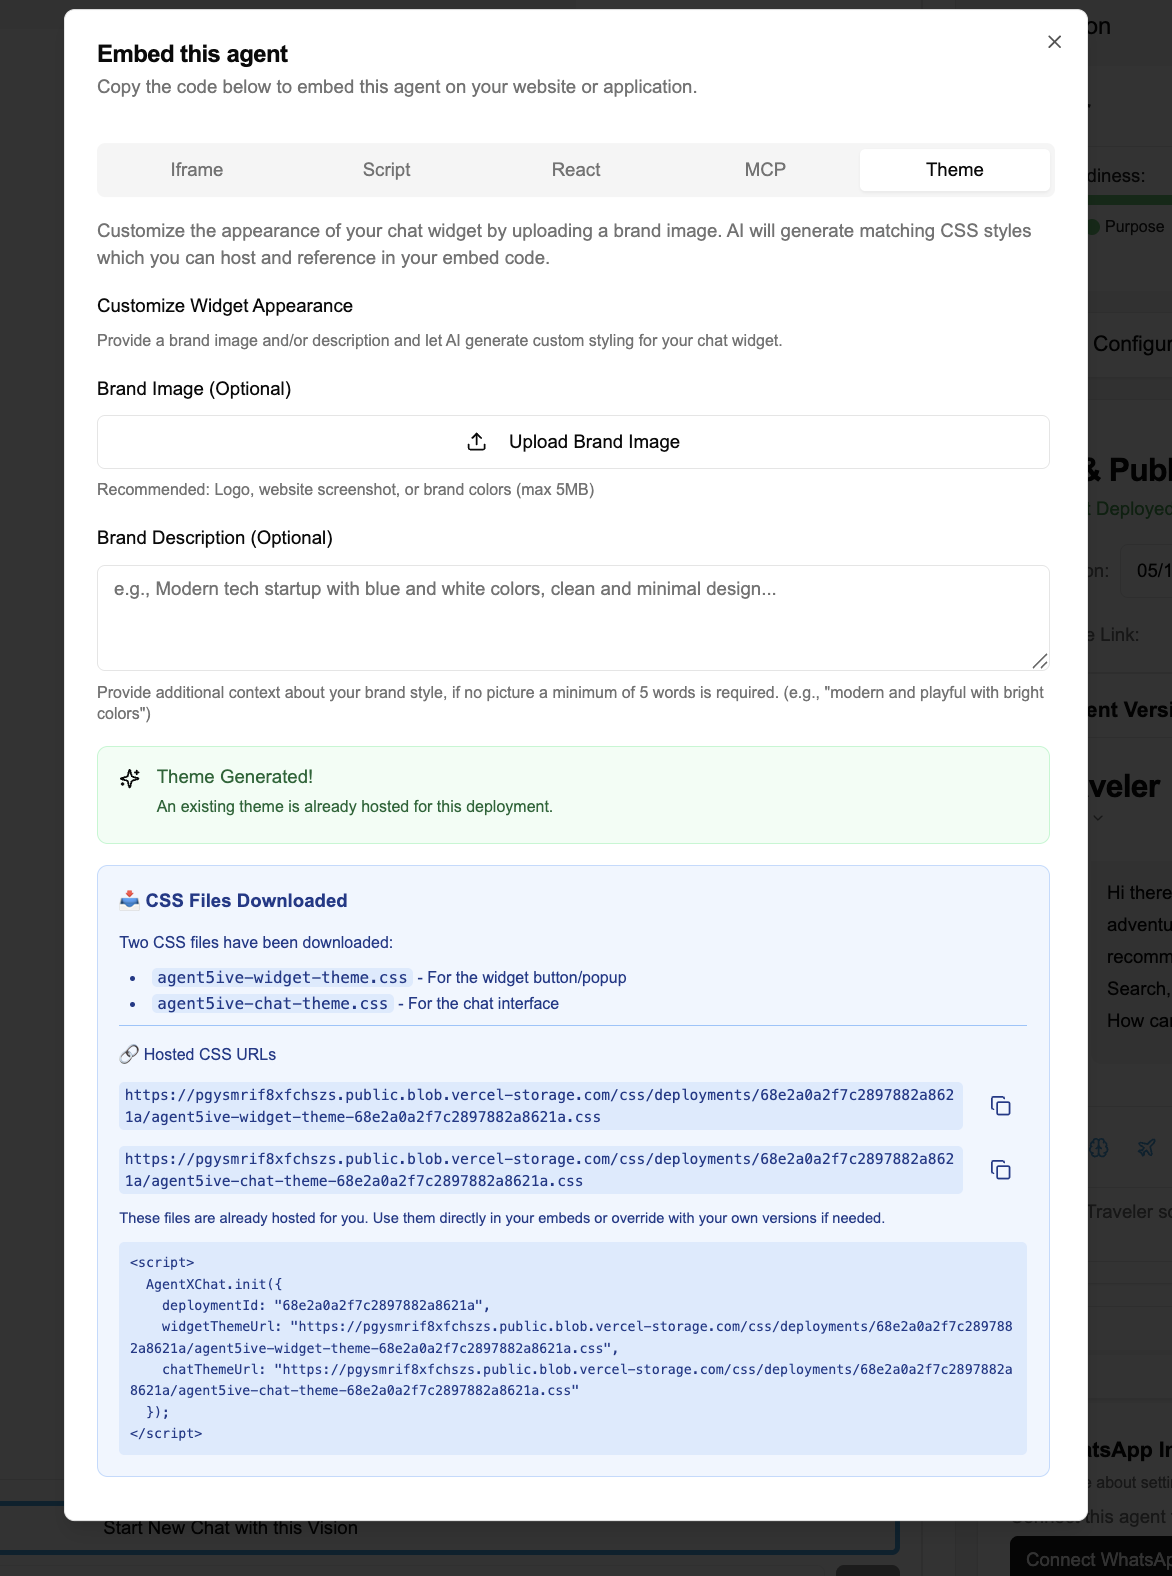
What the Interface Shows:
- Brand Image Upload - Area to upload your logo, website screenshot, or brand colors
- Brand Description - Text field to describe your brand style and aesthetic
- Theme Generated Status - Confirmation that your custom theme has been created and hosted
- CSS Files Downloaded - Display of the two generated CSS files with their hosted URLs on Vercel Blob Storage
- Integration Code - Example code snippet showing how to use the CSS files in your embed
Using AI-Generated Themes in Your Code
Once your theme is generated, you'll receive hosted CSS URLs that you can reference in your embed code:
<script>
  AgentXChat.init({
    deploymentId: "68e2a0a2f7c2897882a8621a",
    widgetThemeUrl: "https://pgysmrif8xfchszs.public.blob.vercel-storage.com/css/deployments/68e2a0a2f7c2897882a8621a/agent5ive-widget-theme-68e2a0a2f7c2897882a8621a.css",
    chatThemeUrl: "https://pgysmrif8xfchszs.public.blob.vercel-storage.com/css/deployments/68e2a0a2f7c2897882a8621a/agent5ive-chat-theme-68e2a0a2f7c2897882a8621a.css"
  });
</script>
Benefits of AI Theme Customization
✓Perfect Brand Alignment
AI analyzes your brand assets to create styles that perfectly match your website's look and feel
✓No CSS Knowledge Required
Skip manual CSS coding - let AI handle the styling complexity for you
✓Hosted and Ready to Use
CSS files are automatically hosted on Vercel Blob Storage - just reference the URLs
✓Flexible Input Options
Use images, text descriptions, or both to guide the AI theme generation
Advanced: Custom CSS Override
While the AI-generated themes work great out of the box, you can also download the CSS files and modify them to fine-tune specific aspects. Host your modified versions and reference them in your embed code:
<script>
  AgentXChat.init({
    deploymentId: "YOUR_DEPLOYMENT_ID",
    widgetThemeUrl: "https://your-domain.com/custom-widget-theme.css",
    chatThemeUrl: "https://your-domain.com/custom-chat-theme.css"
  });
</script>
Best Practices
Performance Considerations
- Load the JavaScript SDK asynchronously to prevent blocking page rendering
- Consider lazy-loading the chat widget only when needed
- For iFrames, use a reasonable height to avoid excessive scrolling
- Test your embedded agent on various devices and screen sizes
User Experience Tips
- Set a clear initial message to guide users on how to interact with the agent
- Match the chat widget's colors to your website's branding
- Consider using the JavaScript SDK for a less intrusive experience
- Use iFrames when you want the chat to be a central part of your page
Public Agent ProtectionSecurity
Agent5ive provides fine-grained access control for public deployments, allowing you to specify exactly who can access your embedded agents. This prevents unauthorized usage and embed code theft.
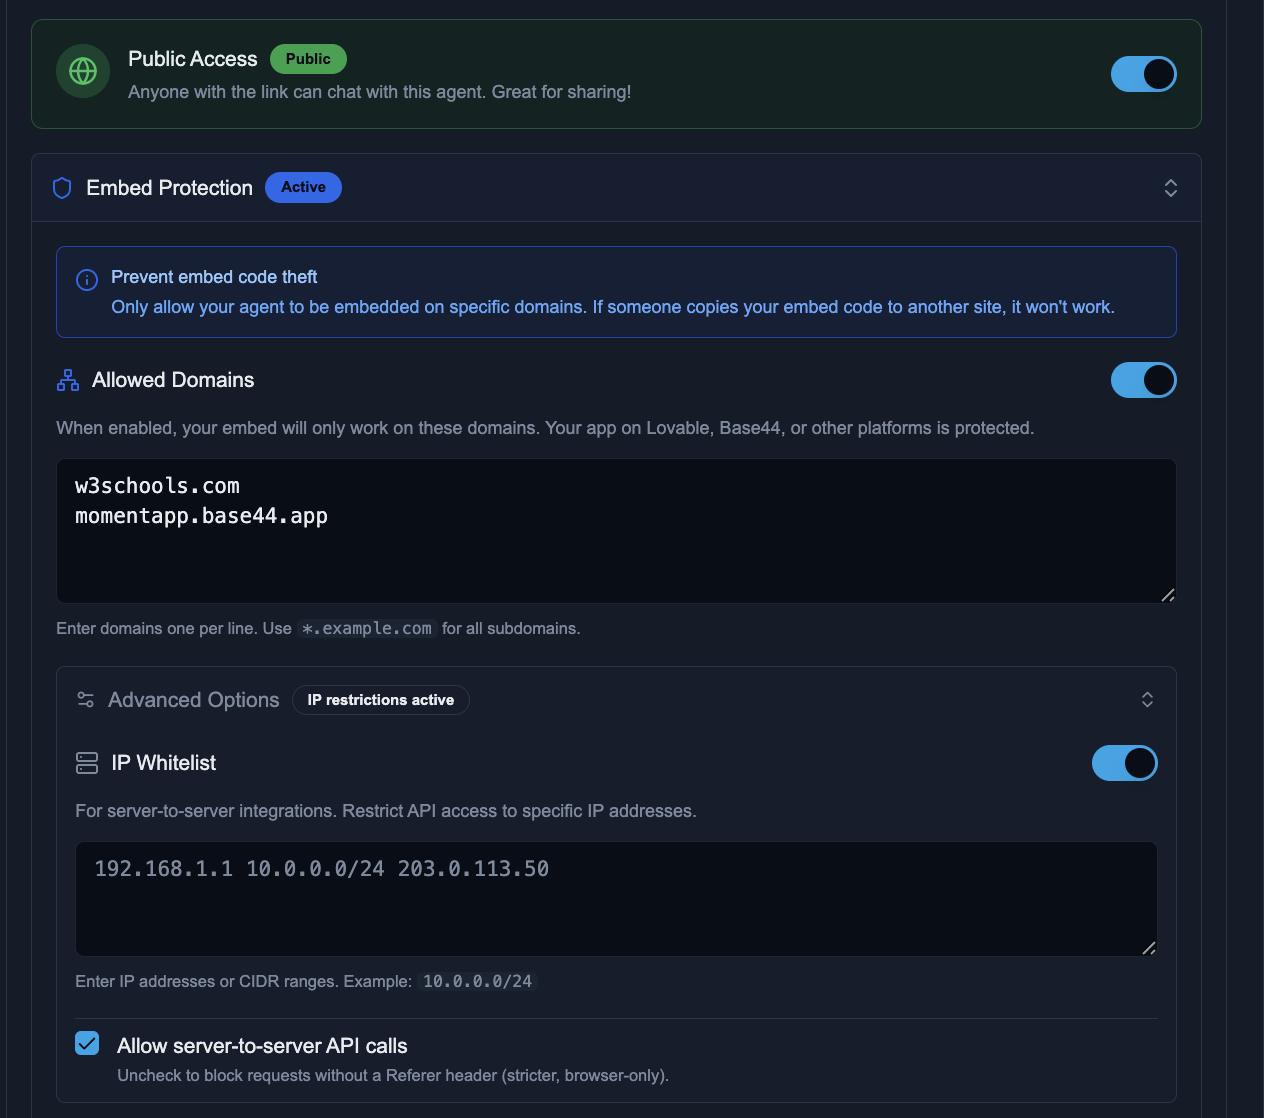
Embed Protection
Embed Protection prevents your embed code from being stolen and used on unauthorized websites. When enabled, your agent will only work on the domains you specify.
Allowed Domains
Configure which domains can embed your agent:
- Enter one domain per line (e.g.,
mywebsite.com) - Use wildcards for subdomains:
*.example.comcovers all subdomains - Include all variations your site uses (www and non-www if applicable)
# Example allowed domains configuration
mywebsite.com
www.mywebsite.com
app.mywebsite.com
*.staging.mywebsite.com
partner-site.com
Advanced Options
For additional security, especially for server-to-server integrations, you can configure IP-based restrictions.
IP Whitelist
Restrict API access to specific IP addresses. This is ideal for server-to-server integrations where you know the source IP addresses.
- Enter individual IP addresses (e.g.,
192.168.1.1) - Use CIDR notation for IP ranges (e.g.,
10.0.0.0/24) - Multiple entries supported, separated by spaces or newlines
# Example IP whitelist
192.168.1.1
10.0.0.0/24
203.0.113.50
Server-to-Server API Calls
The Allow server-to-server API calls option controls whether requests without a Referer header are permitted:
- Enabled (default) - Allows API calls from servers and scripts that don't send Referer headers
- Disabled - Stricter browser-only mode that blocks requests without Referer headers
Recommended Configuration
Website Embed Only
- Enable Embed Protection
- Add your website domain(s)
- Disable server-to-server API calls
- IP Whitelist not needed
Server Integration
- Enable Embed Protection (optional)
- Enable IP Whitelist
- Add your server IP addresses
- Keep server-to-server API calls enabled
Security Considerations
When embedding agents in your website, keep these security considerations in mind:
- Content Security Policy (CSP) - If your website uses a strict CSP, you may need to add
https://agent5ive.comto your allowed sources for scripts, frames, and connect-src - User Authentication - Consider using the userId parameter to maintain conversation context for authenticated users
- Sensitive Information - Be mindful of what information your agent has access to and what it might share in conversations
- Rate Limiting - The Agent5ive platform includes rate limiting to prevent abuse, but you may want to implement additional measures on your side
- Public Agent Protection - Use Embed Protection and IP Whitelisting to control who can access your public agents
If you're embedding your agent on a domain different from agent5ive.com (e.g., yourdomain.com, docs.yourdomain.com), you may encounter CORS (Cross-Origin Resource Sharing) errors in your browser console:
Access to fetch at 'https://agent5ive.com/api/...' from origin 'https://yourdomain.com' has been blocked by CORS policyTemporary Workaround: Use https://www.agent5ive.com (with www) instead of https://agent5ive.com in your embed code. The www subdomain has broader CORS configuration and should work for most domains.
For permanent configuration: Contact Agent5ive support to add your domain to the CORS allowlist:
- Contact Agent5ive support at sales@agent5ive.com
- Provide your domain name(s) and deployment ID
- The team will add your domain to the CORS allowlist (typically 1-2 business days)
Note: Subdomains (like docs.yourdomain.com) may need to be added separately, or you can request wildcard support (*.yourdomain.com) to cover all subdomains.
Getting Help
If you encounter any issues with embedding your agents, or have questions about customization options, please contact our support team at sales@agent5ive.com.