Agent Creation Guide
Learn how to create effective, specialized AI agents using Agent5ive.
The Agent Creation Process
Creating an agent with Agent5ive involves describing your agent's purpose and capabilities, configuring its tools and settings, and then previewing and testing it. This guide will walk you through each step of the process in detail.
The My Agents dashboard is your central hub for managing all your AI agents. Here you can:
- View all your agents - See a list of all agents you've created
- Create new agents - Start the process of creating a new specialized agent
- Edit existing agents - Modify and improve your previously created agents
- Delete agents - Remove agents you no longer need
- Access deployed agents - View and interact with your published agents
Getting Started:
To create a new agent, click the "Create New Agent" button on the My Agents dashboard. This will take you to the Agent5ive Builder where you can describe what you want your agent to do.
Multi-Agent Indicators:
Agents that use other agents as tools will display a "Multi Agent" badge in the dashboard. This indicates that the agent can call on other specialized agents to help answer questions or perform tasks.
Search & Filter Agents:
The My Agents dashboard provides powerful search and filtering capabilities to help you quickly find specific agents:
- Search Bar - Type in the search field to filter agents by name or description
- Filter Button - Click the filter icon (funnel) next to the search bar to access advanced filtering options
Available Filter Options:
- Voice Enabled - Show only agents with voice capabilities
- Multi-Agent - Show only agents that use other agents as tools
- WhatsApp Enabled - Show only agents deployed to WhatsApp
- Telegram Enabled - Show only agents deployed to Telegram
- Has Scheduled Tasks - Show only agents with active scheduled tasks configured
You can combine multiple filters to narrow down your agent list. Active filters are indicated by the highlighted filter button.
Deployment and Version Management
Agent5ive provides robust version management for your deployed agents, allowing you to track changes and revert to previous versions if needed.
Agent Tile Deployment Information
Each agent tile in the My Agents dashboard displays important deployment information:
Latest Deployment
The most recent deployment is prominently displayed on each agent tile:
- Deployment Status - A green "Deployed" badge indicates the agent is live
- Latest Link - A direct link labeled "latest" appears on the tile
- Timestamp - The date and time of the most recent deployment (e.g., "5/3/25, 8:03 AM")
- Quick Access - Click the "View Deployment" link to immediately access the latest version
Pro Tip:
The "latest" label always points to your most recent deployment, making it easy to share the most up-to-date version of your agent with others.
Historical Deployments
Agent5ive maintains a history of your previous deployments, allowing you to access and restore older versions:
- History Access - Click the chevron icon (▼) next to "history" on the agent tile to view previous deployments
- Deployment Timeline - See a chronological list of all deployments with timestamps
- Version Selection - In the Test and Publish playground, use the deployment dropdown to switch between different versions
When to Use Historical Deployments:
Access previous versions when you need to:
- Revert changes that didn't work as expected
- Compare different iterations of your agent
- Recover specific configurations or prompts from earlier versions
- Create a new branch of development based on a previous stable version
Deployment Information Popup
Each agent deployment has an information icon (i) that provides detailed information about the deployment:
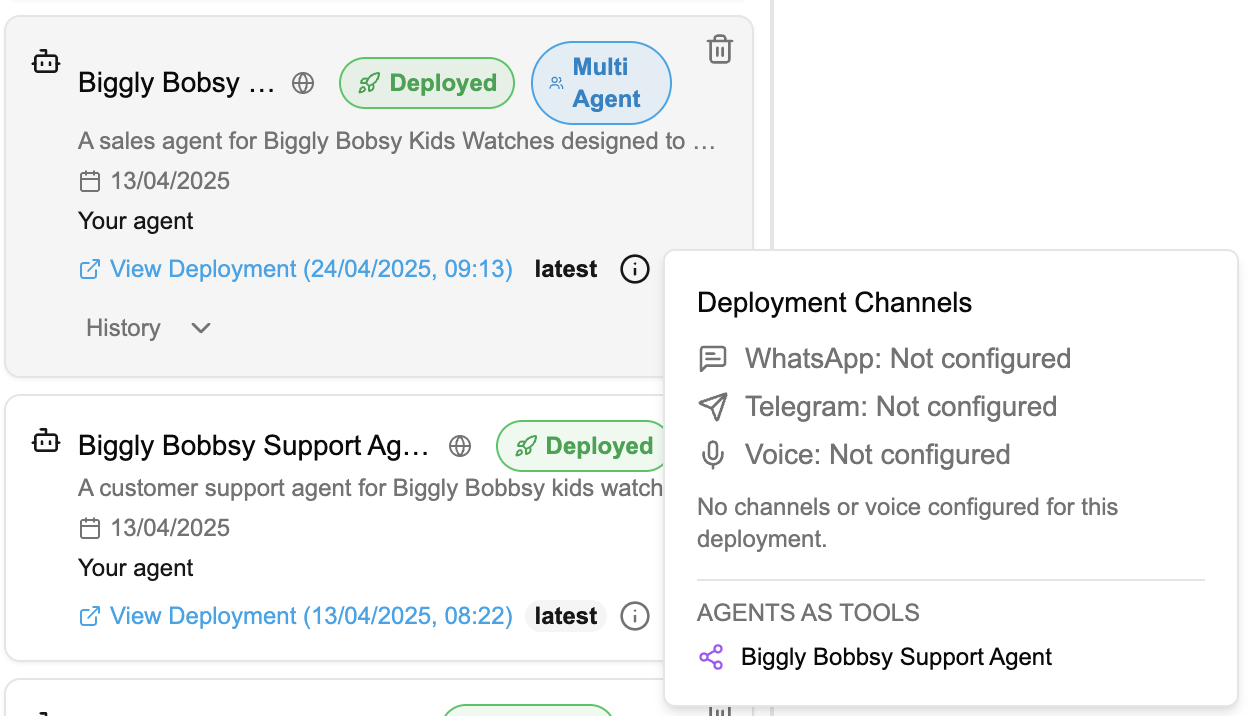
- Deployment Channels - Shows the status of all available communication channels:
- WhatsApp integration status
- Telegram integration status
- Voice capability status
- Scheduled Tasks count - displays the number of scheduled tasks configured for this deployment
- Agents as Tools - Lists all other agents that this agent can use as tools
Quick Status Check:
This popup provides a quick way to verify which channels are configured and which other agents are available as tools for this deployment, without having to navigate to the configuration page.
Version ArenaNew
Version Arena is a powerful feature that allows you to compare multiple agent versions side-by-side in real-time. Access it by clicking the "Arena" button in the agent header when viewing a deployed agent.

Key Features:
- Side-by-Side Comparison - View up to 3 or more agent versions simultaneously, each with its own chat interface
- Version Selection - Each column shows a different deployment version with its timestamp (e.g., "11/23/25, 10:50 AM")
- Broadcast Input - Send the same message to all versions at once using the "Broadcast to all versions" input at the bottom
- Individual Conversations - Each version also has its own input for independent testing
- Add More Versions - Click "+ Add version" to include additional deployments for comparison
When to Use Version Arena:
- Compare how different versions respond to the same query
- Validate improvements or changes between deployments
- A/B test agent behavior before deciding which version to promote
- Debug regressions by comparing current behavior with previous versions
Version Restore
Agent5ive allows you to restore previous versions of your agent configuration. When you select a historical deployment from the Test & Deploy tab, the Agent Configuration tab automatically updates to show that version's settings.
Viewing Historical Versions:
- Version Indicator - A yellow banner shows "Viewing version from [date]" with a "Historical Version" badge
- Configuration Preview - The Agent Configuration tab displays the exact settings from that historical deployment
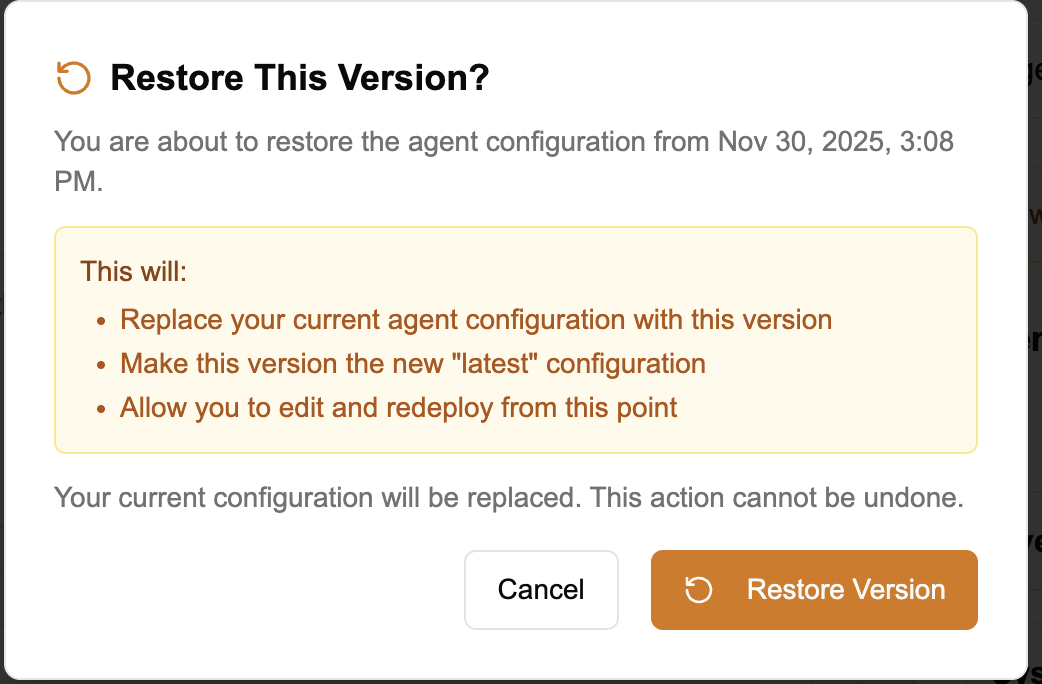
- Restore Button - Click "Restore This Version" to begin the restore process
What Restore Does:
- Replaces Current Configuration - Your current agent configuration is replaced with the selected version
- Updates "Latest" - The restored version becomes the new "latest" configuration
- Enables Editing - You can edit and redeploy from the restored version
When to Use Version Restore:
- Roll back to a stable version after problematic changes
- Recover a specific configuration you want to build upon
- Undo accidental modifications to your agent
- Start fresh from a known working state
Deployment Best Practices
- Meaningful Changes - Deploy new versions when you've made significant improvements or changes
- Testing Before Deployment - Always test your agent thoroughly in the preview mode before publicly publishing
- Version Notes - Keep track of what changes you made in each version for future reference
- Incremental Improvements - Make small, iterative changes rather than complete overhauls for easier troubleshooting
Memory Copy During DeploymentNew
When deploying a new version of an agent that has persistent memory enabled, Agent5ive provides the option to copy memories from a previous deployment. This ensures continuity of learned information across agent versions.
How Memory Copy Works
When you deploy a new version of an agent where both the previous and new deployment have memory enabled, a dialog will appear asking if you want to copy memories from a previous deployment:
- Prerequisites - Both the source (previous) deployment and the target (new) deployment must have persistent memory enabled
- Copy Dialog - A confirmation dialog appears during deployment asking whether to copy memories from the previous version
- What Gets Copied - All stored memories from the previous deployment are copied to the new deployment, including both global and thread-scoped memories
- Optional Operation - You can choose to skip memory copy if you want the new deployment to start fresh without previous memories
Best Practices:
- Copy memories when making incremental improvements to maintain continuity
- Start fresh when the agent's core functionality or domain has changed significantly
- Consider the size of accumulated memories - very large memory stores may take longer to copy
- Test the new deployment after memory copy to ensure memories are being retrieved correctly
Best Practices
- Be specific and detailed in your agent description
- Select tools that complement your agent's purpose
- Test your agent thoroughly after deployment
- Provide examples of expected interactions in your description
- Consider edge cases and how your agent should handle them
- Publish agents publicly if you want to use them as tools for other agents
- Don't be vague or ambiguous in your description
- Avoid adding unnecessary tools that may confuse the agent
- Don't skip the testing phase
- Avoid contradictory instructions in your description
- Don't expect the agent to perform tasks beyond its configured capabilities
Multi-Agent Best Practices
Multi-agents (agents that use other agents as tools) can be powerful when designed correctly. Here are some best practices:
- Create specialized agents - Design each agent with a specific area of expertise rather than making them generalists
- Clear delegation instructions - In your primary agent's description, clearly explain when and how it should delegate to other agents
- Test agent combinations - Thoroughly test how your agents work together before deployment
- Avoid circular dependencies - Don't create loops where Agent A uses Agent B, which uses Agent A
- Limit the number of agent tools - Using too many agent tools can slow down responses and create confusion
- Publish agents publicly - Remember that only publicly published agents can be used as tools for other agents
Knowledge Base
The Knowledge Base feature allows you to provide your agent with specific information it can reference during conversations.This is especially useful for giving your agent access to specialized knowledge or company-specific information.
1. Upload Files
Upload documents (PDF, DOC, TXT, MD, HTML) that contain information you want your agent to access. The agent will be able to reference and cite this information during conversations.
Tip: For best results, ensure your documents are well-structured with clear headings and concise content.This helps the agent accurately retrieve and reference the information.
2. Provide URLs
Enter web URLs that contain relevant information. The agent will scrape and process these websites to extract knowledge it can use.
Note: The system will automatically crawl and index the provided URLs. For websites with multiple pages, consider adding specific page URLs rather than just the homepage to ensure the most relevant content is captured.
3. Add Free Text Notes
Create custom knowledge base notes directly in the interface without needing to upload files or provide URLs. This is perfect for adding specific instructions, FAQs, or company policies.
Add Free Text Knowledge Base Item
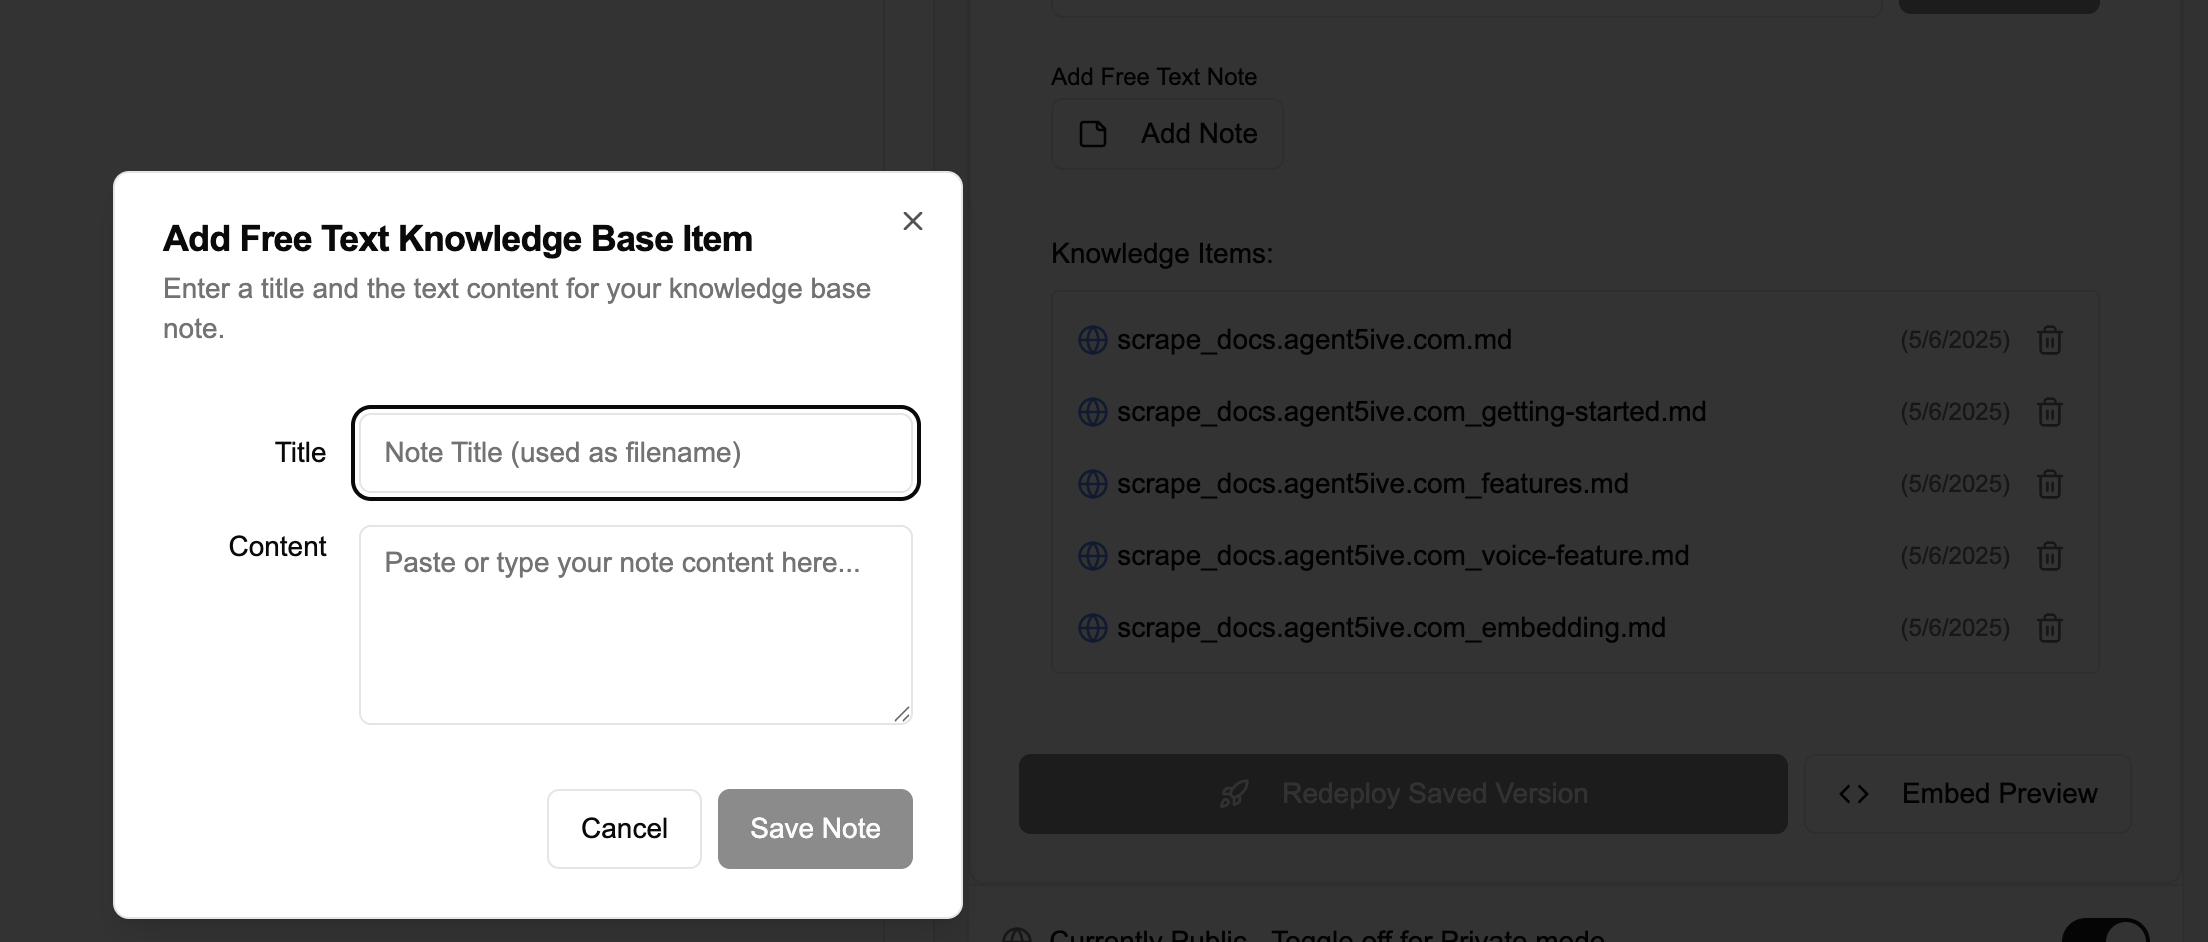
Title: Enter a descriptive title for your knowledge base item. This will be used as the filename.
Content: Paste or type the information you want your agent to access.Format it clearly with headings and paragraphs for best results.
Save Note: Click to add this information to your agent's knowledge base.
Important: Once added, these knowledge items will appear in your agent's configuration. You can manage them by clicking "Edit Details" in the agent configuration. Knowledge items can be removed or updated at any time.
How Agents Use Knowledge Base Items
When a user asks a question, the agent will:
- Search through all knowledge base items for relevant information
- Retrieve the most pertinent content related to the query
- Formulate a response based on this information
- Cite the source of the information when appropriate
This allows your agent to provide accurate, consistent answers based on your specific knowledge base, rather than relying solely on its general training data.